Sunday, March 14, 2010

Homemade Butter

We had a lot of fun making yummy homemade butter this week!

Supplies needed:

  • heavy cream
  • empty baby food jar
  • pinch of salt
  • marble
Fill the container up about half way, you want to make sure and leave enough space for it to shake around.

Add just a pinch of salt.
Drop your marble in and screw the lid on tight!
And then start shaking!! It took about ten minutes and gave the girls and good workout:)

The butter will start to clump together and form a ball, and that's how you know it's done. Then you pour off the buttermilk and save to make something yummy later.
Give it a taste to see how fresh and creamy it is.
We spread it on our Johnny cakes and rolls.

Johnny Cakes

We enjoyed making Johnny Cakes this week in book club. Laura and Mary used to help their mother cook these so the men would have something to eat when they came in from the fields. Laura never understood why they were called Johnny Cakes when it was more bread than cake. Ma thought maybe it was because they called the Southern soldiers Johnny Rebs and they ate so much of it. But she wasn't sure.
Recipe for Johnny Cakes
1 cup corn meal
1 teaspoon sugar
1 tbsp. salt
½ cup water
1 lb. of bacon (we used half)
Instructions:
In a bowl, mix the corn meal with the salt and sugar.
Add water and mix until you get a nice paste. Form the paste into patties and set aside.
Fry bacon. Remove bacon and fry the cakes in the bacon grease until golden brown.
Add the sugar, salt, corn meal,
and water
And then stir it all up.
Fry the bacon and set aside and place the Johnny cakes in the hot bacon grease.
We topped with fresh homemade butter. They tasted ok but not great. Some of the girls liked them better then others. There are other recipes that call for more ingredients and probably taste better but I really wanted to make them authentic, so the girls could see what food tasted like back then.

Sunday, March 7, 2010

Doll Dress

Laura & Mary used scraps of fabric to make small dresses for their rag dolls.
Supplies:
Fabric
Fabric Scissors
Needle & Thread or Sewing Machine
Yarn with large eye needle (or Snap Fastiner)

1.Make a Pattern. Outline the rag doll to make a pattern.

2.Cut 2 pieces ¼ inch larger (all the way around) than pattern for seam allowance.

3.Stitch sides and arms. We did this with a sewing machine (the girls learned how to push the pedel slowly).

4.Hem dress. We let the girls do this part by hand, just like how Laura & Mary used to sew.

5.Finish arm & neck holes. Turn in fabric a bit and stitch. (the neck hole will be pretty wide).

6.Use yarn to stitch around the neck. Put tape on the end of the yarn, to thread the needle. After you put the dress on the doll, you can gather up the neckline a bit.

7. Tie a bow.

Note: The yarn is pretty tough to get through the material. So we used a snap fastiner for some of our dresses (but then you have to make a seam down the back, leaving 2 inches at the top open.) However, the neckline didn't look as good from the front. So now with doing both ways, I like the yarn better.

Sewing doll dresses was fun. But we are thankful that we don't have to make all of our clothes, like Ma did back then.

Thursday, February 25, 2010

Deer Jerky

Laura and Mary used to help Pa dry jerky in the big tree stump with hickory chips so they could have the meat all winter. My husband hunts and so we used deer meat to make our own jerky!! The girls had fun making it and its a yummy healthy snack.

Supplies needed
  • Deer, elk or beef
  • seasonings (found at sporting good stores)
  • a dryer, or over
  • a jerky gun or you could use your hands
Each of the girls got to take a turn squirting out the meet.
I love this picture were A is plugging her nose!


It takes about 4 hours to dry so I had some already for them to taste.
They all LOVED it and ate it up.

Tuesday, February 23, 2010

Molassas-on-Snow-Candy

Laura and Mary used to help their mother make molasses candy for Christmas and since we just got a new layer of fresh snow this week we thought it would be fun to make ourselves some to.

Supplies needed
  • 1 cup molasses
  • 1 cup brown sugar
  • several pans of snow
  • pot and thermometer
First we had to go and and scoop up our snow.

Then measure out the molasses and sugar.

Stir it all up and put on the stove. Cook until it comes to the hard crack stage.
Then carefully drizzle the hot syrup mixer onto the snow and it hardens immediately.

Once it is cool take it out and set on wax paper.

Then enjoy!
The left over snow was yummy to!
We sure had fun!

Thursday, February 18, 2010

Rag Doll

We talked about when Laura received a rag doll for Christmas. She was so happy to have a real doll like Mary had (instead of the corn cob doll she wrapped in a hankerchif).

Supplies Needed:
Muslin material (1 yard for 6 dolls)
Cotton fiberfil stuffing
Unsharpened pencil
Brown yarn
Ribbon
Sissors
Ruler
Sewing machine

The first 3 steps are for the host mom to do the night before.
1.Make doll patern (about 12 inches tall). Cut 2 out of material.
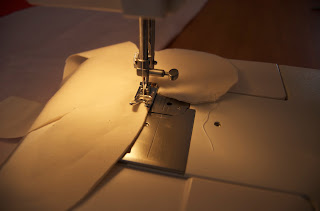
2.Sew 2 together, leaving an opening for the stuffing (I left the top of the head open, since we would cover that with hair later).

3.Make small slits around curves, corners, or points. (be sure not to cut stitching.)

4.The girls start by turning the material inside out (so the seams are on the inside). As you can see, it is a challenging step. (The moms had to help a bit).

5. Fill doll with stuffing. Use the pencil to push the cotton all the way into the legs and arms.
6. Hand stitch the head close. The older girls did this! (The moms started and stopped the double thick thread.)
7.Cut yarn (11 inches long). Group them together in 3-4 pieces.
8.Moms, hand stitch the yarn on for the hair. Put 3-4 pieces of yarn on the needle at a time to stitch to the head. I put about 6 pieces of yarn in front of the middle seam.
9. Moms, continue stiching the yarn all the way down the middle of the back of the head. While the moms are working on this, we gave paper to the girls to draw pictures or write about what they received for Christmas (since this rag doll was Laura's favorite Christmas gift).
10.You can leave the hair loose.
11.Or tie ribbons in the yarn to give the doll pig tails.
The girls had a good time! This project took 90 minutes instead of our normal 60 minute craft.
Next time, we will add faces and make dresses for our rag dolls.