Tuesday, February 23, 2010

Molassas-on-Snow-Candy

Laura and Mary used to help their mother make molasses candy for Christmas and since we just got a new layer of fresh snow this week we thought it would be fun to make ourselves some to.

Supplies needed
  • 1 cup molasses
  • 1 cup brown sugar
  • several pans of snow
  • pot and thermometer
First we had to go and and scoop up our snow.

Then measure out the molasses and sugar.

Stir it all up and put on the stove. Cook until it comes to the hard crack stage.
Then carefully drizzle the hot syrup mixer onto the snow and it hardens immediately.

Once it is cool take it out and set on wax paper.

Then enjoy!
The left over snow was yummy to!
We sure had fun!

Thursday, February 18, 2010

Rag Doll

We talked about when Laura received a rag doll for Christmas. She was so happy to have a real doll like Mary had (instead of the corn cob doll she wrapped in a hankerchif).

Supplies Needed:
Muslin material (1 yard for 6 dolls)
Cotton fiberfil stuffing
Unsharpened pencil
Brown yarn
Ribbon
Sissors
Ruler
Sewing machine

The first 3 steps are for the host mom to do the night before.
1.Make doll patern (about 12 inches tall). Cut 2 out of material.
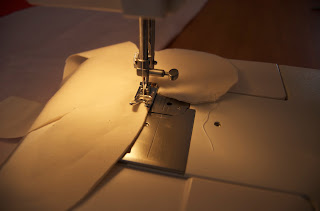
2.Sew 2 together, leaving an opening for the stuffing (I left the top of the head open, since we would cover that with hair later).

3.Make small slits around curves, corners, or points. (be sure not to cut stitching.)

4.The girls start by turning the material inside out (so the seams are on the inside). As you can see, it is a challenging step. (The moms had to help a bit).

5. Fill doll with stuffing. Use the pencil to push the cotton all the way into the legs and arms.
6. Hand stitch the head close. The older girls did this! (The moms started and stopped the double thick thread.)
7.Cut yarn (11 inches long). Group them together in 3-4 pieces.
8.Moms, hand stitch the yarn on for the hair. Put 3-4 pieces of yarn on the needle at a time to stitch to the head. I put about 6 pieces of yarn in front of the middle seam.
9. Moms, continue stiching the yarn all the way down the middle of the back of the head. While the moms are working on this, we gave paper to the girls to draw pictures or write about what they received for Christmas (since this rag doll was Laura's favorite Christmas gift).
10.You can leave the hair loose.
11.Or tie ribbons in the yarn to give the doll pig tails.
The girls had a good time! This project took 90 minutes instead of our normal 60 minute craft.
Next time, we will add faces and make dresses for our rag dolls.

Friday, February 12, 2010

Woven Baskets

This week for our craft we made woven baskets. Of course back in the day they didn't use sour cream containers but for our young group it made it easier.

Supplies

  • scissors
  • tape
  • sour cream container
  • yarn or wool
I wanted to use a rope to make it look more authentic but after trying it, it was to stiff and didn't work. We ended up just using yarn which worked great but I would suggest using a thicker yarn so that the container doesn't show through.

For the older girls we cut the stripes thinner and for the younger ones we did thicker strips so they didn't have to go around as many times. It was a little tricky for the girls but with our help they were able to do it and after going around a few times they caught on.
So all you do is get a piece of string and start at the bottom and go in and out all the way around. When your sting runs out cut another piece and keep going. We did put a little piece of tape on the end of each new string so it would stay in place.


Here is the finished basket. If we did it again I would use darker yarn and like I mentioned before use a thicker one. We also hole punched the top and added a handle.

Friday, February 5, 2010

Little House in the Big Woods

Today we made the entire Big Woods scene for our little log cabin.
Supplies Needed:
  • Elmer's Glue
  • Rocks (we used 2 different sizes)
  • Pine Cones
  • Green Paint
  • Hot Glue Gun
  • Sticks (broken to small pieces)
  • Cotton balls
  • Big square piece of cardboard
Glue Log Cabin onto board.
Glue rocks around cabin.
Make a stone path coming from the front door of the cabin.
Glue wood into a pile.

Paint the tips of the pine cones with green paint.

Or you can dip the pinecones into the paint.
And because of time and for variety, we left some of the pinecones plain (without paint).

Hot glue the pinecones to the board.

We glued cotton balls to the top of their chimneys to look like smoke.

We also ate homemade rolls for a snack.

Monday, January 25, 2010

Little House on the Prairie Log Cabin
This week we made log cabins and talked about what Laura Ingealls home might have looked like. We talked about how most people had to build their own homes and how they had to go out in the forest to cut down logs and use mud to hold them together. We also described the size of the homes and how lots of children slept in one bed. And that most homes had dirt floors but they still swept them and kept their houses clean. The following are the instructions on how to make a little log cabin of your own.
Supplies needed
  • empty milk carton or juice container
  • some newspaper or brown paper bags
  • scissors
  • pencil
  • tape
  • and glue
The first thing you need to do is cut the juice container about 5 in. high all the way around.
Next you need to cut strips of paper the lenght of your juice box and about 6 inches long. We used a brown paper bag from the grocery store but you could also use newspaper and paint it brown after gluing it on to your house. Then take each strip and roll it around a pencil and tape or glue to hold it in place. Because we had younger children and in the interest of time I tried to have a few already rolled but left several for them to do on their own.
Here are the rolled logs ready to go on the house.
Then put a layer of glue on one side at a time.
And carefully place your logs on.

After we had logs on all sides we cut another piece of paper for the roof. Our juice box had the spout on the side so we decided to use that as our chimney. See how cute they turned out.
The girls with their finished houses.


submitted by Janeil Kim